I originally published this article on the Microsoft Tech Community.
Phishing investigations usually start with one suspicious email. A user reports a message, an alert is generated, and an analyst opens the email details, checks the sender, reviews the URL, and tries to understand whether the message is malicious. That’s a normal starting point — but in a real SOC investigation, one email is rarely the full story.
Attackers usually operate in campaigns. They reuse sender infrastructure, similar subjects, URLs, payloads, templates, and delivery techniques. A single email may be only one part of a wider phishing or malware campaign targeting multiple users. That’s why campaign-centric hunting is important.
I wrote this from the perspective of a SOC analyst who often needs to move quickly from a single suspicious email to the full campaign impact. The goal is simple: use Microsoft Defender XDR and Microsoft Sentinel together to understand who was targeted, what was delivered, who clicked, and what should be prioritized first.
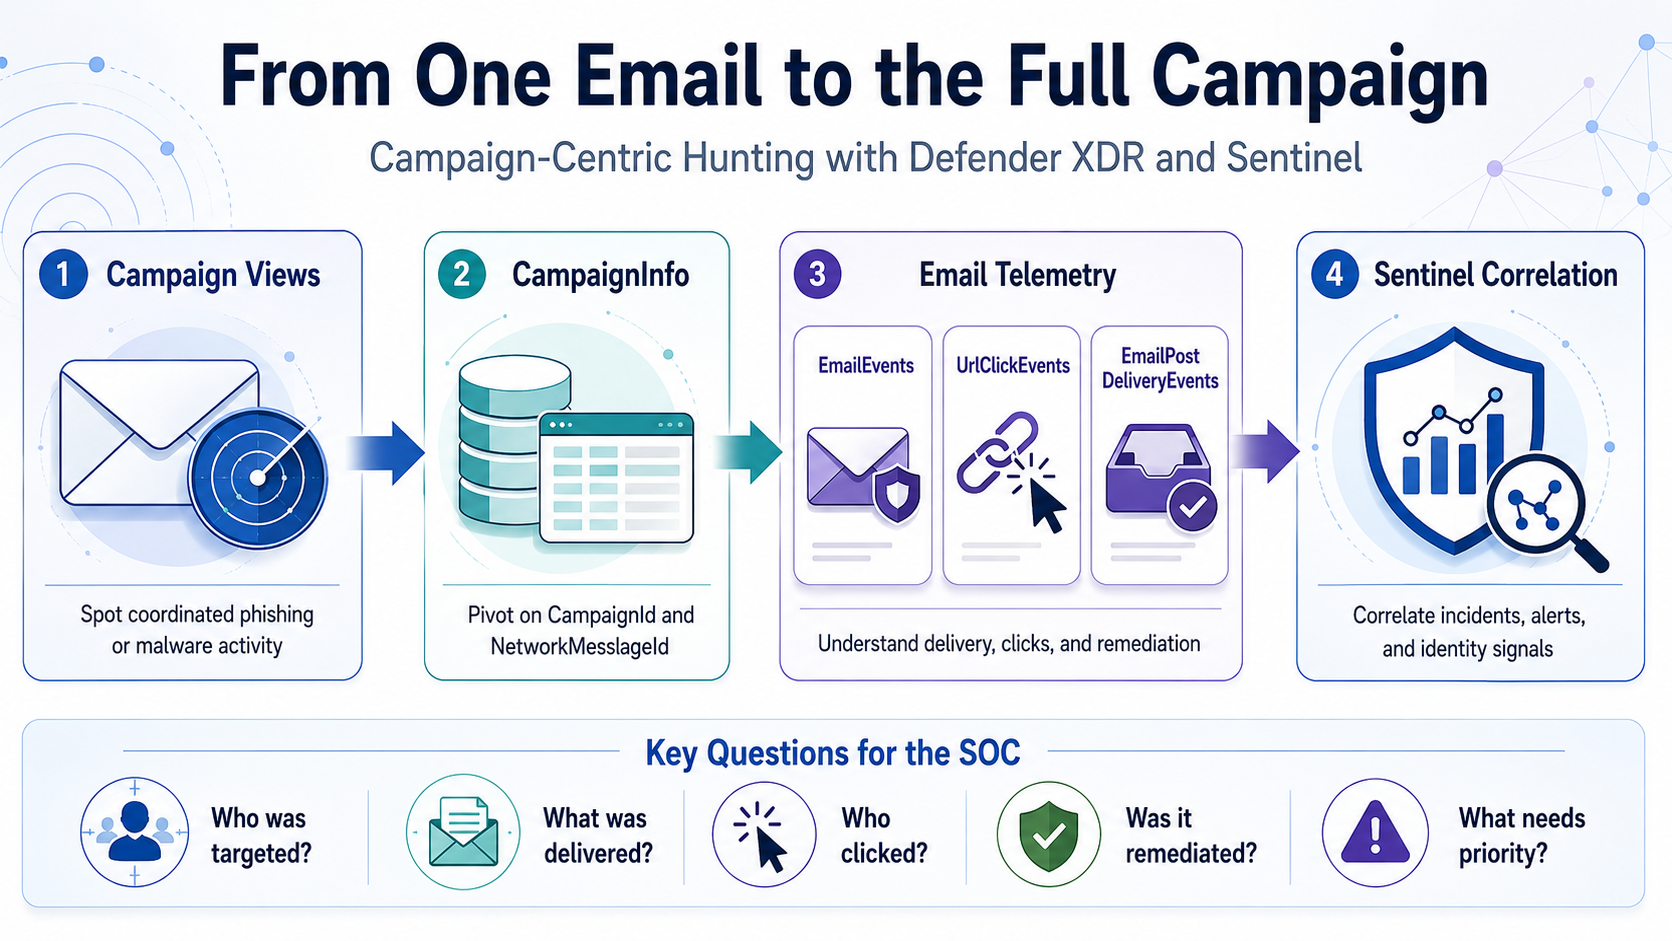
Why campaign-centric hunting
When investigating a phishing or malware email, analysts usually need to answer practical questions: How many users received messages from the same campaign? Were the messages blocked, junked, delivered, or remediated? Did any user click the URL, or click through a Safe Links warning? Were any priority or high-risk users affected? Was the email removed after delivery? Are there related Defender XDR or Sentinel incidents?
If we only investigate one message, we miss the bigger picture. Campaign-centric hunting shifts the question from “Is this email malicious?” to “What is the full impact of this campaign?” — and the response priority should be based on campaign impact, not only a single alert.
What Campaign Views provides
Campaign Views in Microsoft Defender for Office 365 help analysts investigate coordinated email attacks. From it, analysts can review campaign name, type, and subtype; targeted users; inboxed messages; clicked users; visited links; sender domains and IPs; payload URLs; delivery actions; and the campaign timeline and flow.
A reported phishing message may look small at first. But if Campaign Views shows the same campaign targeted 50 users, delivered to 15 inboxes, and had 2 users click the URL, the investigation becomes much more urgent.
Where CampaignInfo fits
The CampaignInfo table gives analysts a KQL-based way to query campaign data. Useful fields:
| Field | Purpose |
|---|---|
CampaignId |
Unique identifier for the campaign |
CampaignName |
Name of the campaign |
CampaignType |
Campaign category, such as Phish or Malware |
CampaignSubtype |
Additional context, such as the brand phished or malware family |
NetworkMessageId |
Unique identifier for the email message |
RecipientEmailAddress |
Recipient affected by the campaign |
Timestamp |
Time the event was recorded |
For correlation, the most important field is usually NetworkMessageId, which connects campaign data with other Defender XDR email tables — EmailEvents, UrlClickEvents, EmailPostDeliveryEvents, EmailAttachmentInfo, and EmailUrlInfo — making CampaignInfo a useful pivot table for campaign-level hunting.
Note:
CampaignInfois currently documented as Preview. Before using these queries in production analytics rules, validate the table availability, schema, and results in your own tenant.
Practical scenario
An analyst receives a phishing alert about a user who received a suspicious email with a credential-harvesting URL. Campaign Views shows the message belongs to a wider campaign — so the investigation shouldn’t stop with the original user. The flow:
- Start from Campaign Views in Defender XDR.
- Identify the campaign details.
- Use
CampaignInfoto list affected users and messages. - Join with
EmailEventsto validate delivery status. - Join with
UrlClickEventsto identify user interaction. - Join with
EmailPostDeliveryEventsto confirm remediation. - Review related Microsoft XDR incidents in Sentinel.
- Prioritize response based on campaign impact.
Query 1: List recent campaigns
CampaignInfo
| where Timestamp > ago(14d)
| summarize
    FirstSeen = min(Timestamp),
    LastSeen = max(Timestamp),
    AffectedUsers = dcount(RecipientEmailAddress),
    Messages = dcount(NetworkMessageId)
  by CampaignId, CampaignName, CampaignType, CampaignSubtype
| order by LastSeen desc
Quickly identifies campaigns that affected the organization during the selected period — which are most recent, which affected the most users, and whether they’re phishing, malware, or spam.
Query 2: Understand delivery impact
A campaign that was fully blocked is different from one that reached inboxes.
let Campaigns =
    CampaignInfo
    | where Timestamp > ago(14d)
    | project CampaignId, CampaignName, CampaignType, CampaignSubtype, NetworkMessageId, RecipientEmailAddress;
Campaigns
| join kind=leftouter (
    EmailEvents
    | where Timestamp > ago(14d)
    | project NetworkMessageId, RecipientEmailAddress, Subject, SenderFromAddress, SenderFromDomain,
              SenderIPv4, DeliveryAction, DeliveryLocation, ThreatTypes, DetectionMethods, Timestamp
) on NetworkMessageId, RecipientEmailAddress
| summarize
    Messages = dcount(NetworkMessageId),
    AffectedUsers = dcount(RecipientEmailAddress),
    Subjects = make_set(Subject, 5),
    SenderDomains = make_set(SenderFromDomain, 10),
    SenderIPs = make_set(SenderIPv4, 10)
  by CampaignId, CampaignName, CampaignType, CampaignSubtype, DeliveryAction, DeliveryLocation
| order by AffectedUsers desc, Messages desc
Delivered messages deserve closer attention, especially if they reached the inbox.
Query 3: Identify users who clicked campaign URLs
let Campaigns =
    CampaignInfo
    | where Timestamp > ago(14d)
    | project CampaignId, CampaignName, CampaignType, CampaignSubtype, NetworkMessageId, RecipientEmailAddress;
Campaigns
| join kind=inner (
    UrlClickEvents
    | where Timestamp > ago(14d)
    | project NetworkMessageId, AccountUpn, Url, ActionType, IsClickedThrough, ThreatTypes,
              DetectionMethods, IPAddress, Workload, ClickTime = Timestamp
) on NetworkMessageId
| summarize
    FirstClick = min(ClickTime),
    LastClick = max(ClickTime),
    ClickEvents = count(),
    ClickedUsers = dcount(AccountUpn),
    ClickThroughUsers = dcountif(AccountUpn, IsClickedThrough == true),
    ClickedUrls = make_set(Url, 10),
    SourceIPs = make_set(IPAddress, 10)
  by CampaignId, CampaignName, CampaignType, CampaignSubtype
| order by ClickThroughUsers desc, ClickedUsers desc, LastClick desc
If a user clicked a phishing URL, the next step should usually include identity-focused investigation — sign-in activity, MFA status, session activity, and possible risky sign-ins.
Query 4: Focus on click-through events
Safe Links may block a malicious site, but a user may continue through the warning page. Those cases deserve careful review.
let Campaigns =
    CampaignInfo
    | where Timestamp > ago(30d)
    | project CampaignId, CampaignName, CampaignType, CampaignSubtype, NetworkMessageId, RecipientEmailAddress;
Campaigns
| join kind=inner (
    UrlClickEvents
    | where Timestamp > ago(30d)
    | where IsClickedThrough == true
    | project NetworkMessageId, AccountUpn, Url, ActionType, ThreatTypes, IPAddress, ClickTime = Timestamp
) on NetworkMessageId
| project ClickTime, CampaignId, CampaignName, CampaignType, CampaignSubtype, AccountUpn,
          RecipientEmailAddress, Url, ActionType, ThreatTypes, IPAddress
| order by ClickTime desc
A click-through doesn’t automatically mean compromise, but it’s a strong reason to investigate the account further.
Query 5: Confirm post-delivery remediation
A malicious message may be delivered first and removed later by ZAP, AIR, or manual remediation.
let Campaigns =
    CampaignInfo
    | where Timestamp > ago(30d)
    | project CampaignId, CampaignName, CampaignType, CampaignSubtype, NetworkMessageId, RecipientEmailAddress;
Campaigns
| join kind=leftouter (
    EmailPostDeliveryEvents
    | where Timestamp > ago(30d)
    | project NetworkMessageId, RecipientEmailAddress, RemediationTime = Timestamp, Action,
              ActionType, ActionTrigger, ActionResult, DeliveryLocation, SourceLocation
) on NetworkMessageId, RecipientEmailAddress
| summarize
    RemediatedMessages = dcountif(NetworkMessageId, isnotempty(ActionType)),
    RemediationTypes = make_set(ActionType, 10),
    RemediationResults = make_set(ActionResult, 10),
    LastRemediation = max(RemediationTime)
  by CampaignId, CampaignName, CampaignType, CampaignSubtype
| order by LastRemediation desc
Answers a key question: were the delivered malicious messages actually removed?
Query 6: Campaign blast-radius summary
Combines campaign, delivery, click, and remediation data into one campaign-level view.
let TimeRange = 30d;
let Campaigns =
    CampaignInfo
    | where Timestamp > ago(TimeRange)
    | project CampaignId, CampaignName, CampaignType, CampaignSubtype, NetworkMessageId, RecipientEmailAddress;
let Delivery =
    EmailEvents
    | where Timestamp > ago(TimeRange)
    | summarize
        DeliveryActions = make_set(DeliveryAction, 10),
        DeliveryLocations = make_set(DeliveryLocation, 10),
        DeliveredMessages = dcountif(NetworkMessageId, DeliveryAction =~ "Delivered"),
        JunkedMessages = dcountif(NetworkMessageId, DeliveryAction =~ "Junked"),
        BlockedMessages = dcountif(NetworkMessageId, DeliveryAction =~ "Blocked"),
        Subjects = make_set(Subject, 5),
        SenderDomains = make_set(SenderFromDomain, 10)
      by NetworkMessageId, RecipientEmailAddress;
let Clicks =
    UrlClickEvents
    | where Timestamp > ago(TimeRange)
    | summarize
        ClickEvents = count(),
        ClickThroughEvents = countif(IsClickedThrough == true),
        FirstClick = min(Timestamp),
        LastClick = max(Timestamp),
        ClickedUrls = make_set(Url, 10)
      by NetworkMessageId;
let Remediation =
    EmailPostDeliveryEvents
    | where Timestamp > ago(TimeRange)
    | summarize
        RemediationActions = make_set(ActionType, 10),
        LastRemediation = max(Timestamp)
      by NetworkMessageId, RecipientEmailAddress;
Campaigns
| join kind=leftouter Delivery on NetworkMessageId, RecipientEmailAddress
| join kind=leftouter Clicks on NetworkMessageId
| join kind=leftouter Remediation on NetworkMessageId, RecipientEmailAddress
| summarize
    AffectedUsers = dcount(RecipientEmailAddress),
    Messages = dcount(NetworkMessageId),
    DeliveredMessages = sum(DeliveredMessages),
    JunkedMessages = sum(JunkedMessages),
    BlockedMessages = sum(BlockedMessages),
    TotalClickEvents = sum(ClickEvents),
    ClickThroughEvents = sum(ClickThroughEvents),
    Subjects = make_set(Subjects, 10),
    SenderDomains = make_set(SenderDomains, 10),
    ClickedUrls = make_set(ClickedUrls, 10),
    RemediationActions = make_set(RemediationActions, 10),
    LastClick = max(LastClick),
    LastRemediation = max(LastRemediation)
  by CampaignId, CampaignName, CampaignType, CampaignSubtype
| extend SuggestedPriority =
    case(
        ClickThroughEvents > 0, "High",
        TotalClickEvents > 0, "Medium",
        DeliveredMessages > 0, "Medium",
        "Low"
    )
| order by SuggestedPriority asc, AffectedUsers desc, Messages desc
The goal isn’t only to collect more data — it’s to help the analyst decide what needs attention first.
Correlating campaign activity with Microsoft Sentinel
When Defender XDR is connected to Sentinel, incidents and alerts synchronize into the Sentinel queue, letting the SOC correlate campaign email activity with suspicious sign-ins, identity alerts, endpoint alerts, cloud app activity, OAuth consent, and related XDR incidents. For example, if a user clicked a phishing URL, the SOC can check whether that user had suspicious sign-in activity shortly after.
SecurityIncident
| where TimeGenerated > ago(30d)
| where ProviderName == "Microsoft XDR"
| where Title has_any ("phish", "phishing", "email", "malware", "campaign")
| summarize
    Incidents = count(),
    HighSeverity = countif(Severity == "High"),
    MediumSeverity = countif(Severity == "Medium"),
    Closed = countif(Status == "Closed"),
    Active = countif(Status == "Active")
  by bin(TimeGenerated, 1d)
| order by TimeGenerated desc
This doesn’t replace campaign hunting — it helps analysts understand how email-related activity appears in the Sentinel incident queue.
Suggested SOC workflow
- Start from Campaign Views — review campaigns with delivered messages, clicked users, or high user impact.
- Pivot to KQL — use
CampaignInfoto list campaign messages and affected recipients. - Validate delivery — join with
EmailEvents(blocked, junked, delivered, replaced). - Review interaction — join with
UrlClickEventsfor clicks and click-throughs. - Confirm remediation — join with
EmailPostDeliveryEvents. - Correlate in Sentinel — review related XDR incidents alongside identity, endpoint, and cloud activity.
- Decide response — escalate, notify affected users, review sign-ins, revoke sessions, reset passwords, block sender domains/URLs, submit false negatives, create watchlists, or tune rules.
Suggested priority logic
| Condition | Suggested priority |
|---|---|
| Campaign blocked before delivery | Low |
| Campaign delivered to junk | Low to Medium |
| Campaign delivered to inbox | Medium |
| Campaign delivered to multiple inboxes | Medium to High |
| User clicked URL | High |
| User clicked through warning | High |
| Priority account clicked | High |
| Click followed by suspicious sign-in | Critical |
Adapt this model to each organization’s risk profile and response process.
Limitations and things to validate
Before production use, validate: Defender for Office 365 Plan 2 availability, Campaign Views permissions, CampaignInfo table availability, Defender XDR connector configuration, advanced hunting event streaming, field names in your environment, retention period, data latency, and join behavior using NetworkMessageId.
One important limitation: some URL click events may not join cleanly with email metadata — for example, clicks from Drafts or Sent Items may not have the same message metadata available. And because CampaignInfo is currently Preview, avoid depending on it alone for critical production automation without testing and validation.